My goal in this blog post is to try to get to the root of how JavaScript inheritance works in three cases: without explicitly doing it, using modern prototype-based inheritance, and using modern pseudo-class-based inheritance.
(This post is definitely not for beginners to JavaScript, but for someone who already knows it and wants to understand it a little deeper.)
Functions
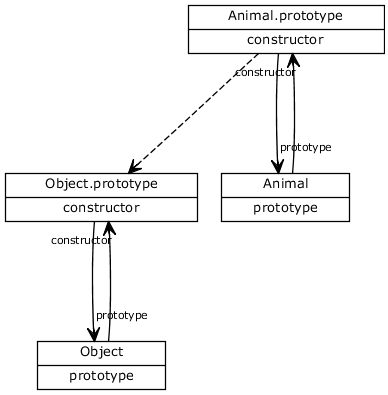
function Animal() { }On the surface, this code seems to create a function called Animal. But with JavaScript, the full truth is slightly more complicated. What actually happens when this code executes is that two objects are created. The first object, called Animal, is the constructor function itself. The second object, called Animal.prototype, has a property called Animal.prototype.constructor, which points to Animal. Animal has a property which points back to its prototype, Animal.prototype. This is illustrated in this diagram:

Although not shown in the diagram above, Animal.prototype actually inherits from the Object.prototype object. All objects in Javascript ultimately inherit from the Object.prototype object. A link from the object to the object it inherits from is stored in the internal __proto__ property (which is not publicly available in all browsers). The __proto__ property is illustrated in this diagram with a dashed line:
The "new" Operator
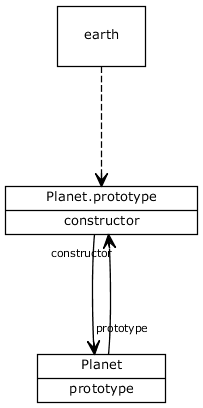
function Planet() { }
var earth = new Planet();
JavaScript's built-in "new" operator is how JavaScript attempts to emulate class-based inheritance. The "new" operator creates a new object, in this case called "earth", calls the function "Planet" on it, then sets the __proto__ property of the new object to Planet.prototype.
This allows functions to act like classes in some ways, but creating a deep inheritance hierarchy is impossible using just the "new" operator. For example, how could you create a new class that inherits from the Planet "class"?
Using the "Object.create" Function to Implement Prototype-Based Inheritance
Because of the fact that most browsers do not let programmers directly access the __proto__ property, it is difficult to create objects in JavaScript that directly inherit from another object--the very definition of prototype-basd inheritance. To simplify this, Douglas Crockford discovered an improved way to create new objects in JavaScript. His function, illustrated below, creates an object which inherits from the object passed to the function, thus providing a simple method of implementing prototypal inheritance.
function createObject(parent) {
  function TempClass() {}
  TempClass.prototype = parent;
  var child = new TempClass();
  return child;
}
I will walk through what this function does one line at a time with diagrams.
1. function TempClass() {}

2. TempClass.prototype = parent
3. var child = new TempClass()

A version of this function is actually implemented on all the newer browsers (including Internet Explorer 9, Firefox 4, and Chrome 9) as "Object.create". But it is easy to implement it yourself if you need to support older browsers, using the formulation above or that described by Douglas Crockford in Prototypal Inheritance in JavaScript.
Using the Inherit Function to Emulate Class-Based Inheritance
Imagine that you wanted to use class-based inheritance in JavaScript. You might want to do something like this:
function Mammal() {
  this.hasHair = true;
}

function Bear() {
  Mammal.call(this); // Call parent constructor
  this.roars = true;
}
inherit(Bear, Mammal);

var yogi = new Bear();
alert(yogi.hasHair); // This should display 'true'
Note the call to "Mammal.call" in the Bear constructor. This calls the parent constructor, similar to super() in Java or base() in C#. To implement the above, you can create some version of the "inherit" function:
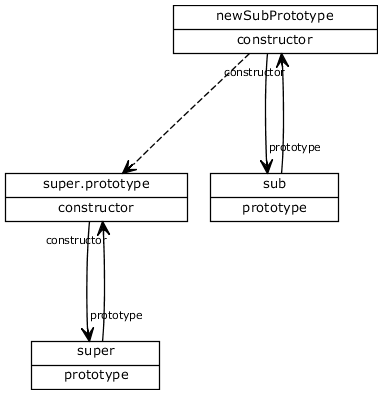
function inherit(sub, super) {
var newSubPrototype = createObject(super.prototype);
newSubPrototype.constructor = sub;
sub.prototype = newSubPrototype;
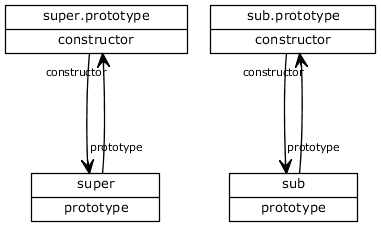
}The inherit function takes two classes (functions) as parameters, and makes the first class inherit from the second one. In memory, here is how each line of the inherit function works...
1. Before the function is run, we have two classes, sub and super:
2. var newSubPrototype = createObject(super.prototype)
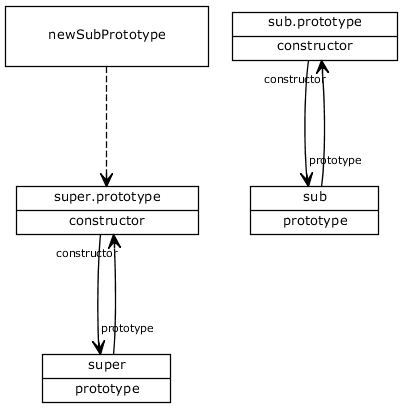
3. newSubPrototype.constructor = sub

4. sub.prototype = newSubPrototype
Using one of these two methods can allow you to implement whichever inheritance scheme you like, which is one of the reasons why JavaScript can be so powerful if understood correctly.
Related Links
- Tim Caswell's Learning Javascript with Object Graphs, Part 2, and Part 3
- Dmitry A. Soshnikov's JavaScript. The core.
(A deep understanding of scope, inheritance, closures.) - Mozilla's JavaScript Reference
- Douglas Crockford's Prototypal Inheritance in JavaScript
(Updated 2011-04-23 - Additional clarifications based on comments.)
(Updated 2011-05-16 - Added missing call to super constructor in Bear constructor.)
(Updated 2011-05-16 - Added missing call to super constructor in Bear constructor.)
