You can also visit my personal page at http://www.kevinalbrecht.com
20 August 2015
Blog Retired
I am no longer posting to this blog. To see my up-to-date blog on programming, visit https://medium.com/kevin-on-code
02 June 2013
Value Attributes Don't Always Mean What You Think They Mean
I recently discovered the hard way that the "value" attributes of different HTML elements can have subtle and frustratingly different meanings.
Take a look at this simple example:
After running this code, you would probably guess that the text visible in the two widgets would both be "three", but in fact, the button will display "three" while the text box will display "two"!
The reason behind this is that for certain input element types, the "value" attribute defines the initial text of the widget, while for other element types, the "value" attribute defines the visible text of the widget!
The important distinction here is between the "value" attribute (the
Take a look at this simple example:
<input type="button" value="one" id="buttonX">
<input type="text" value="one" id="textX">

<script>
  var buttonX = document.getElementById("buttonX");
  var textX = document.getElementById("textX");

  buttonX.value = "two";
  textX.value = "two";

  buttonX.setAttribute("value","three");
  textX.setAttribute("value","three");
</script>
(View this as a JSFiddle: http://jsfiddle.net/sEpMz/)After running this code, you would probably guess that the text visible in the two widgets would both be "three", but in fact, the button will display "three" while the text box will display "two"!
The reason behind this is that for certain input element types, the "value" attribute defines the initial text of the widget, while for other element types, the "value" attribute defines the visible text of the widget!
The important distinction here is between the "value" attribute (the
value="something" that appears in the HTML), and the "value" property (elementX.value = 'something' in JavaScript). The property will always reflect what is displayed in the widget on the page, while the attribute has different behavior depending on the type of the input element.
23 May 2013
A Short Survey on the State of Functional Reactive Programming in ClojureScript
In the Object-Oriented world of JavaScript, architectures like MVP, MVC, and their brethren are well established. But when I started using ClojureScript to build rich user interfaces on the web, I was naturally interested in finding ways to architect my site that are friendly to a functional programming language like Clojure. This led me to functional reactive programming, or FRP.
FRP, probably the best-known user interface paradigm for functional programming, models UIs as dataflows, where changes (user actions or data source changes) propagate through the system using purely functional operations and eventually end up as visual changes back in the UI. In short, FRP is similar to how changes to a cell in a spreadsheet propagate to other dependent cells.
Though the ClojureScript ecosystem is still fairly immature (or perhaps because it is), there are many libraries which support the FRP style of programming. If you are looking for an alternative to faking object-oriented styles of programming in ClojureScript, jump in and give one or more a try!
(By the way, if you want my personal recommendation, I have had a lot of luck with the simplicity and power of widje.)
(By the way, if you want my personal recommendation, I have had a lot of luck with the simplicity and power of widje.)
Native ClojureScript libraries
C2
cljs-binding
Javelin
Pedestal
Widje
cljs-binding
Javelin
Pedestal
Widje
ClojureScript libraries built on top of JavaScript libraries
acute (wrapper around AngularJS)
rx-cljs (wrapper around RxJS)
Yolk (wrapper around Bacon.js)
rx-cljs (wrapper around RxJS)
Yolk (wrapper around Bacon.js)
- Yolk (Github)
- Wilkes Joiner on Yolk and FRP (YouTube video)
- Yolk Examples (Github)
- Bacon.js (Github)
Using JavaScript libraries directly
22 December 2011
My Programming Reading List
I started collecting links to reading materials for programmers recently for my own use, but I realized it could be more generally useful. Checkout my list here, and check back often for updates:
Kevin’s Programming Reading List
Kevin’s Programming Reading List
07 December 2011
My Git Setup
Mostly for my own personal future reference, here is how I setup my Git environment.
Multiple Accounts
I love Git for source control, and it is a goal of mine to keep all of my personal projects on GitHub. That is easy enough, but for work, I also need to be able to use Git with two different accounts connecting to two different servers.
For this example, I am going to assume there are two accounts: a GitHub account associated with a personal email, and an account hosted on an imaginary GitDude service associated with a work email.
Step 1: Create RSA Keys
When using only one account on a computer, you can use global settings for user.name and user.email. However, when using two separate accounts, you need to use local settings for each repo. If you want to still use global settings, you will still need to use local settings for the repos that don't use the global credentials.
References
Multiple Accounts
I love Git for source control, and it is a goal of mine to keep all of my personal projects on GitHub. That is easy enough, but for work, I also need to be able to use Git with two different accounts connecting to two different servers.
For this example, I am going to assume there are two accounts: a GitHub account associated with a personal email, and an account hosted on an imaginary GitDude service associated with a work email.
Step 1: Create RSA Keys
- Generate a key for GitHub:
ssh-keygen -t rsa -C "personal_email@example.com" - When prompted, choose the following location for your file to go:
/Users/your_username/.ssh/id_rsa_github - Follow instructions in the "Set up Git" section on http://help.github.com/ to upload your public key to GitHub. On the same page, follow the instructions for setting your github.user and github.token config values.
- Generate a key for GitDude:
ssh-keygen -t rsa -C "work_email@example.com" - When prompted, choose the following location for your file to go:
/Users/your_username/.ssh/id_rsa_gitdude
Step 2: Setup Config File
- Create a blank file called "config" in your ~/.ssh directory.
- Edit the file, and type the following text:
Host gitdude.com
  HostName git.gitdude.com
  User git
  IdentityFile /Users/your_username/.ssh/id_rsa_gitdude

Host github.com
  HostName github.com
  User git
  IdentityFile /Users/your_username/.ssh/id_rsa_github
Step 3: Setup User Name and Email
When using only one account on a computer, you can use global settings for user.name and user.email. However, when using two separate accounts, you need to use local settings for each repo. If you want to still use global settings, you will still need to use local settings for the repos that don't use the global credentials.
- See this to get a list of all global settings:
git config --global -l - Use this to set global git info:
git config --global user.name "First Last"
git config --global user.email "your_email@example.com" - Or this for local:
git config --local user.name "First Last"
git config --local user.email "your_email@example.com"
Same for github.user and github.token properties, if appropriate.
Step 4: Setup Default Editor
In order to write multiline commits, you will want to associate git with an editor:
This allows you to make commits like "git commit". The editor will then open and allow you to enter a commit message.
Step 4: Setup Default Editor
In order to write multiline commits, you will want to associate git with an editor:
git config core.editor emacs
This allows you to make commits like "git commit". The editor will then open and allow you to enter a commit message.
References
30 November 2011
Non-Locking Concurrency Control
At work this week I have been working on implementing a concurrency control strategy on a system. During the discussions, software transactional memory (STM) came up, as we want to develop a solution that does not involve locking, and since my primary experience with it is Clojure's built-in STM, I brought that up.
The world seems to be helping out today with a link on Hacker News to an old discussion involving Clojure's creator Rich Hickey: Clojure: STMs vs Locks. Good food for thought.
It is great to see that my Clojure knowledge is proving to be surprisingly useful at work. Those years of being a closeted functional programming nerd are paying off!
I also re-watched Rich Hickey's talk "Are We There Yet?" and reread "Equal Rights for Functional Objects" by Henry G. Baker, which are both great resources for really thinking about state in a functional manner.
20 November 2011
My Clojure Environment Setup
Mostly for my own personal future reference, here is how I setup my Clojure environment.
Emacs
Based on instructions from Leiningen (github.com).
References
Emacs
- Install Emacs 24 (links to the binaries available here).
- Install the Emacs Starter Kit or the Emacs Prelude.
Based on instructions from Leiningen (github.com).
- Get the Leiningen batch script from https://raw.github.com/technomancy/leiningen/master/bin/lein.bat and edit it to fetch version 1.6.1.1 instead of 2.0.0-SNAPSHOT.
- Put lein.bat in a folder. Add that folder to your PATH.
- Download wget.exe and curl.exe and add them to your PATH.
- Run:
lein self.install
Setting Up Emacs for Clojure
- Setup clojure-mode
- Setup swank-clojure
- Follow installation instructions from swank-clojure (github.com).
11 May 2011
Mirror of the Joy Programming Language
I have been working on a pet project recently which was greatly inspired by fascinating little programming language called Joy. If you can, imagine combining Scheme with Forth, and that is basically what Joy is. It is a wonder of minimal, yet functional, programming language design, and a mind-bender to boot.
In any case, a couple of days ago, the original homepage for Joy went down. Considering that the language was created by a retired professor and maintained at his old university, there are any number of reasons why it went down, and seems likely never to come back again. With the hope that this language will not disappear from the web, I have mirrored the complete contents of the original Joy programming language homepage on my personal site.
19 April 2011
Understanding JavaScript Inheritance
JavaScript is a language which can be difficult to understand deeply. As opposed to most object-oriented programming languages, JavaScript is not class-based, it is prototype-based. This means that objects inherit from other objects, not classes. But while it is prototype-based, it has a syntax and features to make it seem like it is class-based. Because JavaScript seems confused about whether it is class-based or prototype-based, it can be difficult to use it correctly in either way. However, with a little bit of information about how JavaScript works behind the scenes, it is possible to emulate class-based inheritance or take full advantage of prototype-based inheritance.
My goal in this blog post is to try to get to the root of how JavaScript inheritance works in three cases: without explicitly doing it, using modern prototype-based inheritance, and using modern pseudo-class-based inheritance.
(This post is definitely not for beginners to JavaScript, but for someone who already knows it and wants to understand it a little deeper.)
Functions
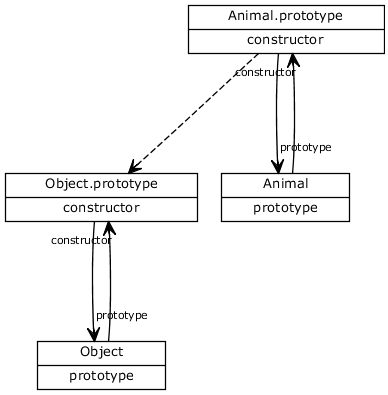
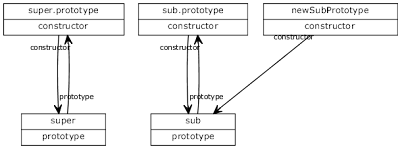
On the surface, this code seems to create a function called Animal. But with JavaScript, the full truth is slightly more complicated. What actually happens when this code executes is that two objects are created. The first object, called Animal, is the constructor function itself. The second object, called Animal.prototype, has a property called Animal.prototype.constructor, which points to Animal. Animal has a property which points back to its prototype, Animal.prototype. This is illustrated in this diagram:

Although not shown in the diagram above, Animal.prototype actually inherits from the Object.prototype object. All objects in Javascript ultimately inherit from the Object.prototype object. A link from the object to the object it inherits from is stored in the internal __proto__ property (which is not publicly available in all browsers). The __proto__ property is illustrated in this diagram with a dashed line:
The "new" Operator
JavaScript's built-in "new" operator is how JavaScript attempts to emulate class-based inheritance. The "new" operator creates a new object, in this case called "earth", calls the function "Planet" on it, then sets the __proto__ property of the new object to Planet.prototype.
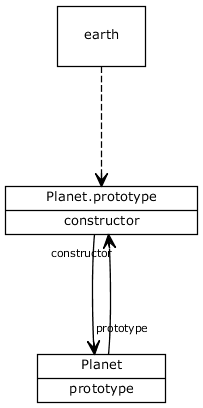
This allows functions to act like classes in some ways, but creating a deep inheritance hierarchy is impossible using just the "new" operator. For example, how could you create a new class that inherits from the Planet "class"?
Using the "Object.create" Function to Implement Prototype-Based Inheritance
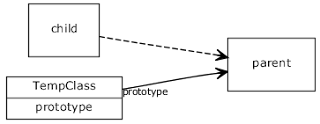
Because of the fact that most browsers do not let programmers directly access the __proto__ property, it is difficult to create objects in JavaScript that directly inherit from another object--the very definition of prototype-basd inheritance. To simplify this, Douglas Crockford discovered an improved way to create new objects in JavaScript. His function, illustrated below, creates an object which inherits from the object passed to the function, thus providing a simple method of implementing prototypal inheritance.
I will walk through what this function does one line at a time with diagrams.
1. function TempClass() {}

2. TempClass.prototype = parent

3. var child = new TempClass()
A version of this function is actually implemented on all the newer browsers (including Internet Explorer 9, Firefox 4, and Chrome 9) as "Object.create". But it is easy to implement it yourself if you need to support older browsers, using the formulation above or that described by Douglas Crockford in Prototypal Inheritance in JavaScript.
Using the Inherit Function to Emulate Class-Based Inheritance
Imagine that you wanted to use class-based inheritance in JavaScript. You might want to do something like this:
Note the call to "Mammal.call" in the Bear constructor. This calls the parent constructor, similar to super() in Java or base() in C#. To implement the above, you can create some version of the "inherit" function:
The inherit function takes two classes (functions) as parameters, and makes the first class inherit from the second one. In memory, here is how each line of the inherit function works...
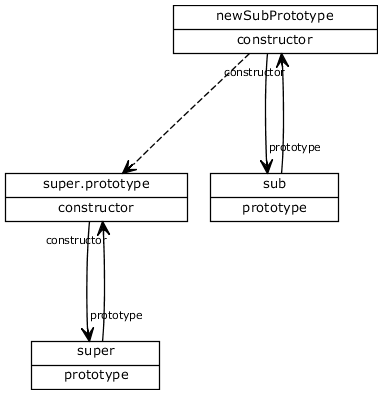
1. Before the function is run, we have two classes, sub and super:
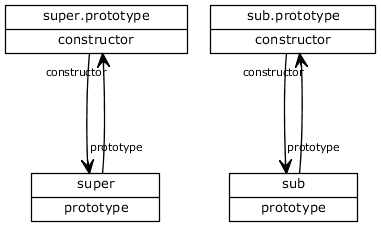
2. var newSubPrototype = createObject(super.prototype)
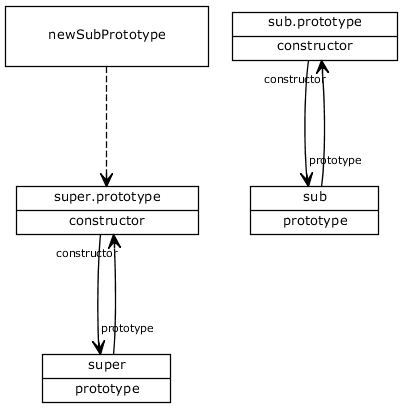
3. newSubPrototype.constructor = sub
4. sub.prototype = newSubPrototype
Using one of these two methods can allow you to implement whichever inheritance scheme you like, which is one of the reasons why JavaScript can be so powerful if understood correctly.
Related Links
My goal in this blog post is to try to get to the root of how JavaScript inheritance works in three cases: without explicitly doing it, using modern prototype-based inheritance, and using modern pseudo-class-based inheritance.
(This post is definitely not for beginners to JavaScript, but for someone who already knows it and wants to understand it a little deeper.)
Functions
function Animal() { }On the surface, this code seems to create a function called Animal. But with JavaScript, the full truth is slightly more complicated. What actually happens when this code executes is that two objects are created. The first object, called Animal, is the constructor function itself. The second object, called Animal.prototype, has a property called Animal.prototype.constructor, which points to Animal. Animal has a property which points back to its prototype, Animal.prototype. This is illustrated in this diagram:

Although not shown in the diagram above, Animal.prototype actually inherits from the Object.prototype object. All objects in Javascript ultimately inherit from the Object.prototype object. A link from the object to the object it inherits from is stored in the internal __proto__ property (which is not publicly available in all browsers). The __proto__ property is illustrated in this diagram with a dashed line:
The "new" Operator
function Planet() { }
var earth = new Planet();
JavaScript's built-in "new" operator is how JavaScript attempts to emulate class-based inheritance. The "new" operator creates a new object, in this case called "earth", calls the function "Planet" on it, then sets the __proto__ property of the new object to Planet.prototype.
This allows functions to act like classes in some ways, but creating a deep inheritance hierarchy is impossible using just the "new" operator. For example, how could you create a new class that inherits from the Planet "class"?
Using the "Object.create" Function to Implement Prototype-Based Inheritance
Because of the fact that most browsers do not let programmers directly access the __proto__ property, it is difficult to create objects in JavaScript that directly inherit from another object--the very definition of prototype-basd inheritance. To simplify this, Douglas Crockford discovered an improved way to create new objects in JavaScript. His function, illustrated below, creates an object which inherits from the object passed to the function, thus providing a simple method of implementing prototypal inheritance.
function createObject(parent) {
  function TempClass() {}
  TempClass.prototype = parent;
  var child = new TempClass();
  return child;
}
I will walk through what this function does one line at a time with diagrams.
1. function TempClass() {}

2. TempClass.prototype = parent
3. var child = new TempClass()

A version of this function is actually implemented on all the newer browsers (including Internet Explorer 9, Firefox 4, and Chrome 9) as "Object.create". But it is easy to implement it yourself if you need to support older browsers, using the formulation above or that described by Douglas Crockford in Prototypal Inheritance in JavaScript.
Using the Inherit Function to Emulate Class-Based Inheritance
Imagine that you wanted to use class-based inheritance in JavaScript. You might want to do something like this:
function Mammal() {
  this.hasHair = true;
}

function Bear() {
  Mammal.call(this); // Call parent constructor
  this.roars = true;
}
inherit(Bear, Mammal);

var yogi = new Bear();
alert(yogi.hasHair); // This should display 'true'
Note the call to "Mammal.call" in the Bear constructor. This calls the parent constructor, similar to super() in Java or base() in C#. To implement the above, you can create some version of the "inherit" function:
function inherit(sub, super) {
  var newSubPrototype = createObject(super.prototype);
  newSubPrototype.constructor = sub;
  sub.prototype = newSubPrototype;
}
The inherit function takes two classes (functions) as parameters, and makes the first class inherit from the second one. In memory, here is how each line of the inherit function works...
1. Before the function is run, we have two classes, sub and super:
2. var newSubPrototype = createObject(super.prototype)
3. newSubPrototype.constructor = sub

4. sub.prototype = newSubPrototype
Using one of these two methods can allow you to implement whichever inheritance scheme you like, which is one of the reasons why JavaScript can be so powerful if understood correctly.
Related Links
- Tim Caswell's Learning Javascript with Object Graphs, Part 2, and Part 3
- Dmitry A. Soshnikov's JavaScript. The core.
(A deep understanding of scope, inheritance, closures.) - Mozilla's JavaScript Reference
- Douglas Crockford's Prototypal Inheritance in JavaScript
(Updated 2011-04-23 - Additional clarifications based on comments.)
(Updated 2011-05-16 - Added missing call to super constructor in Bear constructor.)
(Updated 2011-05-16 - Added missing call to super constructor in Bear constructor.)
04 April 2011
Installing Google's Closure Linter on Windows
I am working on a JavaScript project right now, so I decided to try out Closure Linter, Google's relatively new JavaScript code style verification tool that is part of their Closure Tools collection. I'm using Windows 7 64-bit, and their instructions for using Closure Linter on Windows do not quite make it clear what all needs to be done to get it working.
In case this is helpful to someone else in the future, here are the steps I took (modified from those found at How to Use Closure Linter):
In case this is helpful to someone else in the future, here are the steps I took (modified from those found at How to Use Closure Linter):
- Download and install Python 2.7.x for Windows 32-bit. Note that you must choose the 32-bit version of Python from the 2.7.x branch to ensure that you can use the EasyInstaller program needed for the next step.
- Download and install SetupTools/EasyInstall for Python 2.7.
- Install Closure Linter:
- In a command prompt, change directory to to C:\Python27\Scripts
- Run this command:
easy_install http://closure-linter.googlecode.com/files/closure_linter-latest.tar.gz
Now you will be able to run Closure Linter using variations on this command:
C:\Python27\Scripts\gjslint --nojsdoc -r DIRECTORY_TO_LINT
C:\Python27\Scripts\gjslint --nojsdoc -r DIRECTORY_TO_LINT
Good luck with the tool!
Subscribe to:
Posts (Atom)
